Aug 29, 2012

Dreamcatcher Nail Art Design.

Hello, lovelies!

Today I will be showing you probably the most time consuming nail art desgin!
It is this pretty dreamcatcher design and dreamcatcher are one of the many things that I love!
It is a difficult design but with practice it'll be easy.


Let's get started!


Start off by applying any kind of dark or pastal shade, I chose this purple gray color!

Using a very thin art brush dip it into black polish and create half a cirlcle like shown.


Create a triangle on the uper side of the circle.

Create another triangle facing the previous one then add to lines next to the first triangle.

Connect the previous lines with lines coming from the second trinagle like shown.

Draw lines from the lines we connected previously.

Draw around the lower part of the nail and draw 3 lines coming out of the dreamcatcher.

Add white dots on the places shown.

Using a dotting tool dot on a peachy colored nail polish on the shown lines.

Add a blue dot to the middle line.

Apply a clear naipolish and you're done.


Enjoy!
xoxo

Aug 28, 2012

All Time Make Up Routine.


Hello, everyone!

Today I thought of showing the products that I use most of the time to do my make up at any time. I don't wear make up daily because I find it damaging to both skin & eyes so I try to keep it minimum most of the time! 
I have combination skin which means that my face is dry to normal and my t-zone which is; nose between eyebrows and chin, is oily which is completely normal for girls my age.

1- First I apply a lotion all over my face and sunblock if it's morning time

2- I use MAC's Pro Longwear concealer all of the time! It gives an amazing coverage and lasts all day. I use it under my eyes, around my nose, and on any blemshes that I might have.

3- I apply MAC's Studio Fix with a buffing brush all over my face and focusing it manily on my t-zone, I use it as a foundation and it works very well and it doesn't make your face look powdery at all.

4- Then I use Benefit's Moon Beam highlighter on my cheekbones, it gives a beautiful healthy glow to my face.


5- Moving on to blush, I use literally a touch of this blush because it's very pigmented and it gives the most perfect natural pink cheeks look! 


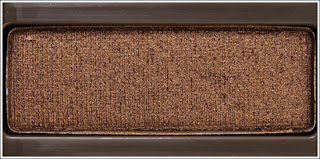
6- For eyeshadows, I use Urban Decay Snakebite on my uper and lashline, for the uper lashline I press it into my lashline drawing a slightly winged line and blend it softly, for the lower lashline I just apply it smoothly and blend it. I use Urban Decay's Foxy eyeshadow on my brow bone and inner corners.


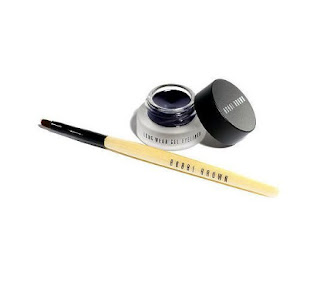
7- This step depends on my mood, sometimes after blending the shadow to my lashlines I draw a thin winged line using Bobbi Brown's gel eyeliner or inside my waterline.

8- Last but not least I use my all time favorite mascara which is Maybline's Colossal mascara on my top and buttom lashes, this mascara is the absolute best!


9- For the brows I use a touch of Urban Deacy's Blackout shadow and fill in my brows but very lightly then I comb through them with an eyebrow comb so they look very natural.

10- Lastly I put on my favortite lipgloss which is Revlon Strawberry Fraise and sometimes I switch up to darker colors or pinks.

That is it for my all time make up routine, it is very simple and it only takes me 10 minutes to do and it really suits my face! I think that everyone has their own routine which suits them best, but sharing this might help some of you out there!

Have a lovely day

xoxo

Aug 26, 2012

Nails INC Polishes Small Haul & Review.


Hello everyone! 
I recently got three polishes from the brand Nails INC, I've been really curious to try their polishes and especially the magnetic one! Sadly Sephora here in Riyadh doesn't bring their polishes so you can either get them online or when you travel.

The polishes turned out to be great! The quality is really good and the effect of the magnet is wonderful.
I got two magnetic polishes and one 3D polish.


The first one is in this red color which I absolutely love! 

 
This is how the effect is going to look on your nail, it doesn't show up as much in camera.


The second magentic polish is this golden one which doesn't give a strong effect or at least not as strong as the red one due to it's strong shimmer.


This is how the effect is going to look on your nail.


The third is my abolute favorite! I've been wearing this a lot from how much I love it.


The name of the polish is called "Solane Square" and the glitters do look a bit 3D-ish


This how the glitter looks like!

This is it for today's post, I highly recommend all of these polishes, they are really good and worth the price! The company is coming up with different magnetic effects really soon which are going to look amazing.

Have a lovely day

xoxo

Aug 11, 2012

Lana Del Rey National Anthem Music Video Nail Art.

Hello, goregeous!
It's been a long while since I've posted! I hope you're all having a wonderful Ramdhan.
Since I've been absent, I decided to do a fancy post for you all!
In Lana Del Rey's recent music video I couldn't elp but fall in love with her nails, the design was so simple and beautiful, and looked very easy to do.
P.S. Fake nails are optional, I put them on for he sake of this post.


Let's get started!


I wore false nails because of my nails' shape, so it's optional, you can re-create it on your own nails. 
Paint all of your nails with a nude color.

Using a mate silver and a brush create two curved lines close to the end of the nail pointing upwards.

Continue creating the lines until you reach this look.

Repeat the same process using a silver shimmery colored nail polish.

That's the finished look!

I hope you enjoy this.

xoxo